
In this part you create a menu – step by step, until the till and the guest app show it. The example is a breakfast menu at “Café Muster Graz”.
Where do I find the menus?
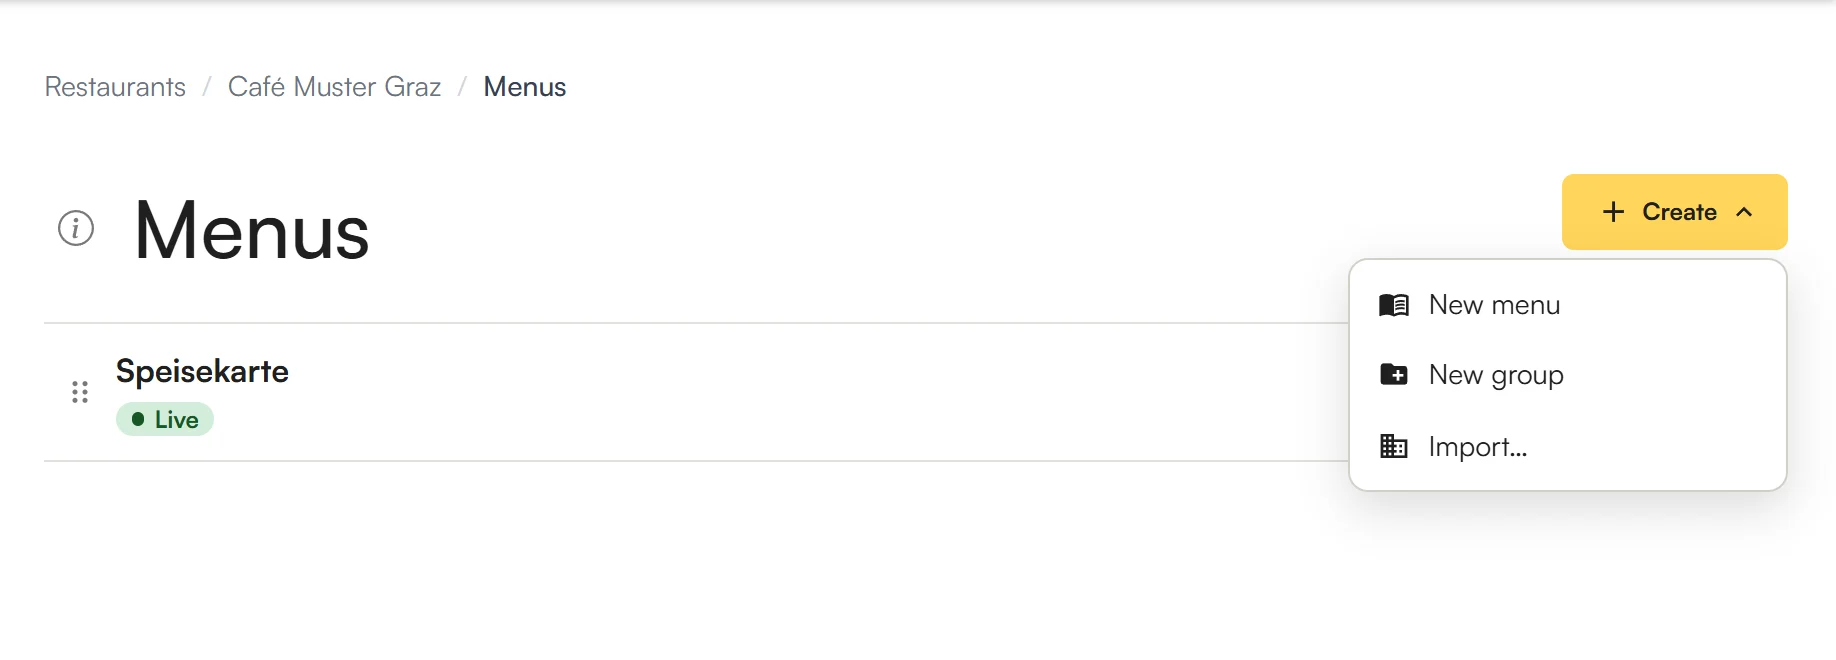
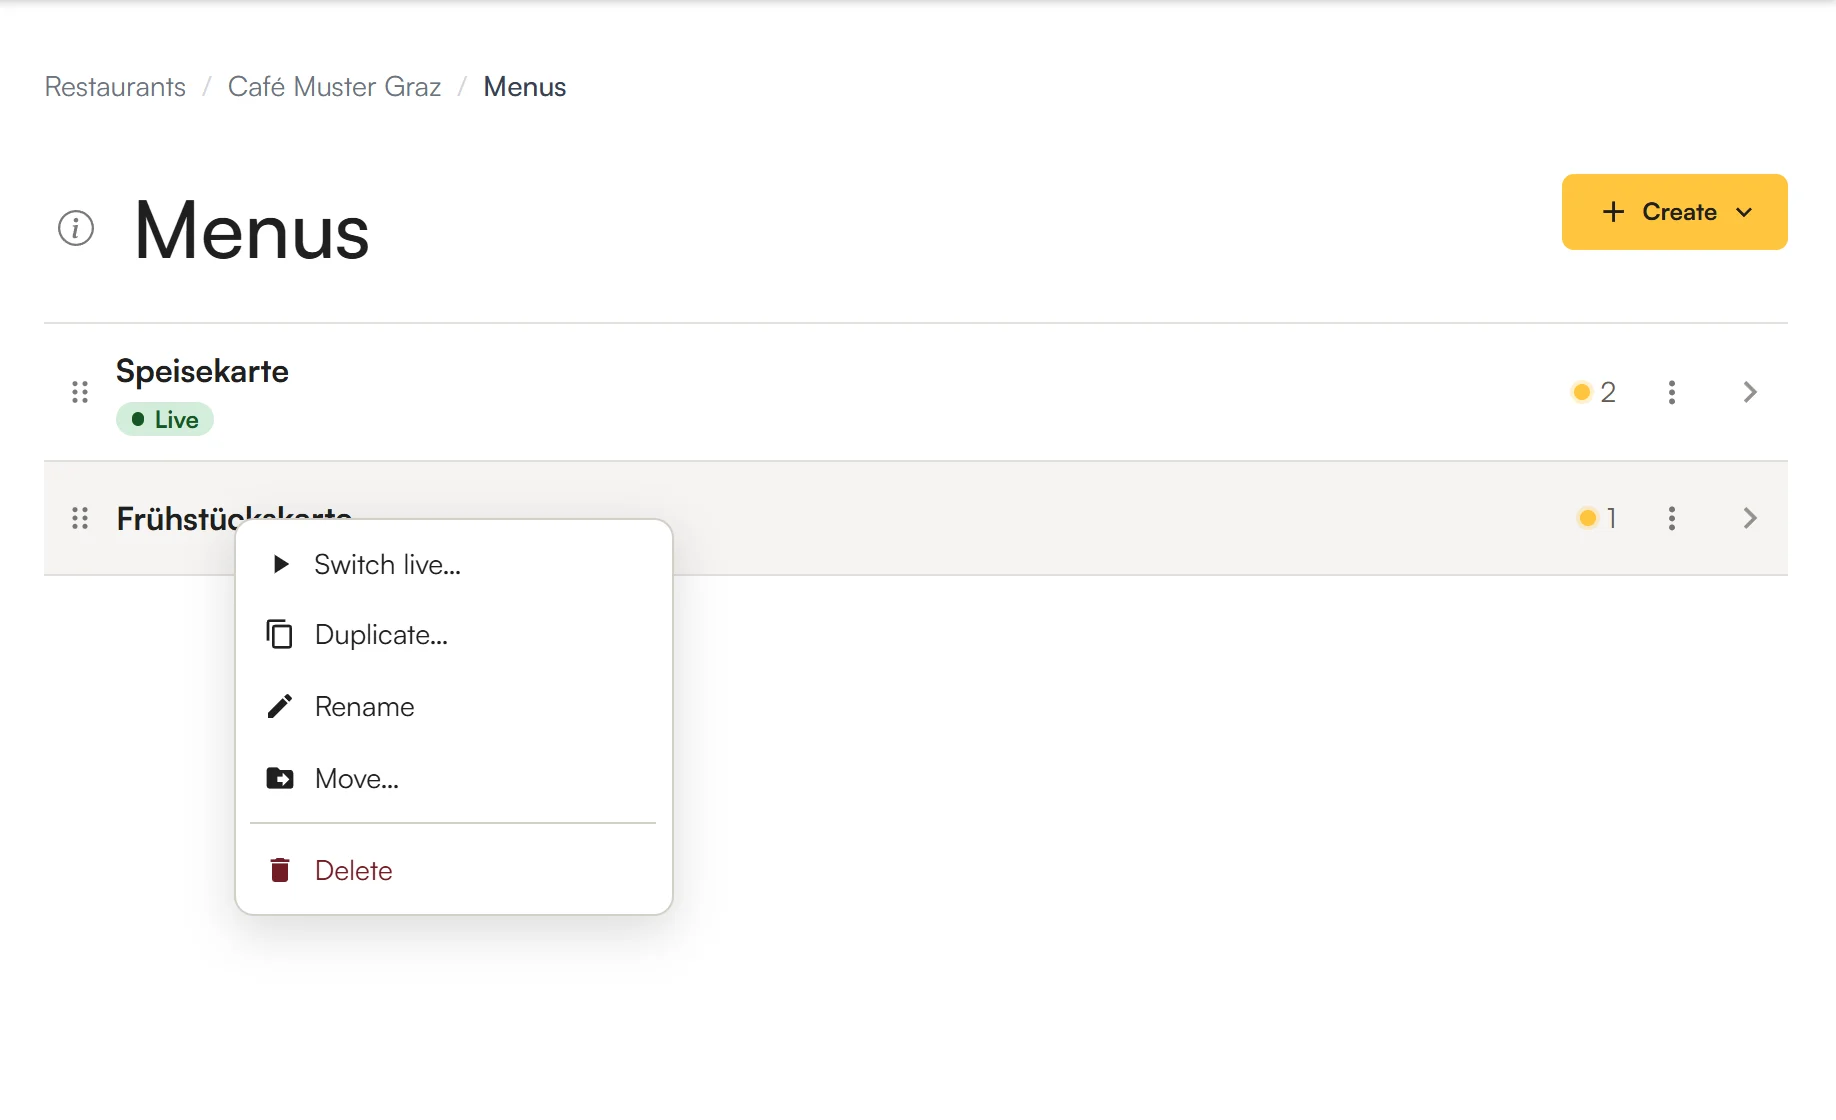
Open your restaurant on partner.elyvent.com and tap Menus on the left. All of the restaurant’s menus are listed there. The green Live label shows which one the till and the app use right now.
Can’t see Menus? Then you don’t have the rights for it – ask your manager.
Create a new menu
- Tap Create at the top right → New menu.
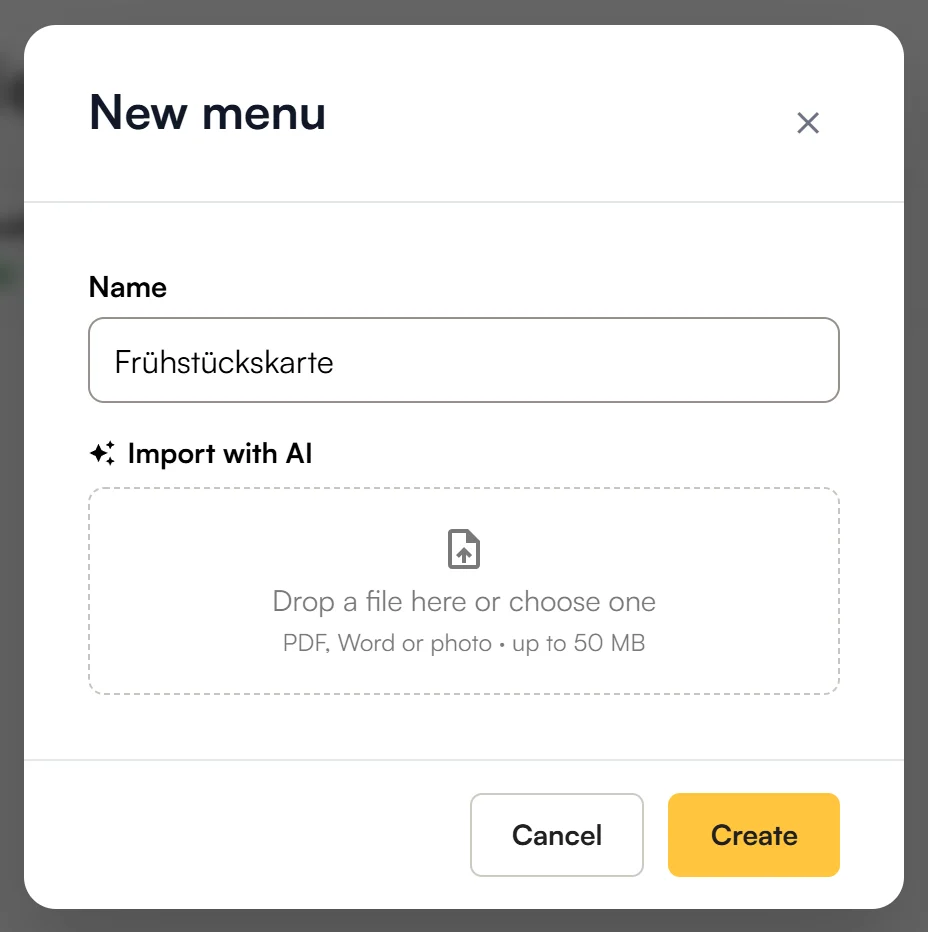
- Enter a name, for example “Breakfast”.
- Tap Create. The new menu opens.
The editor at a glance
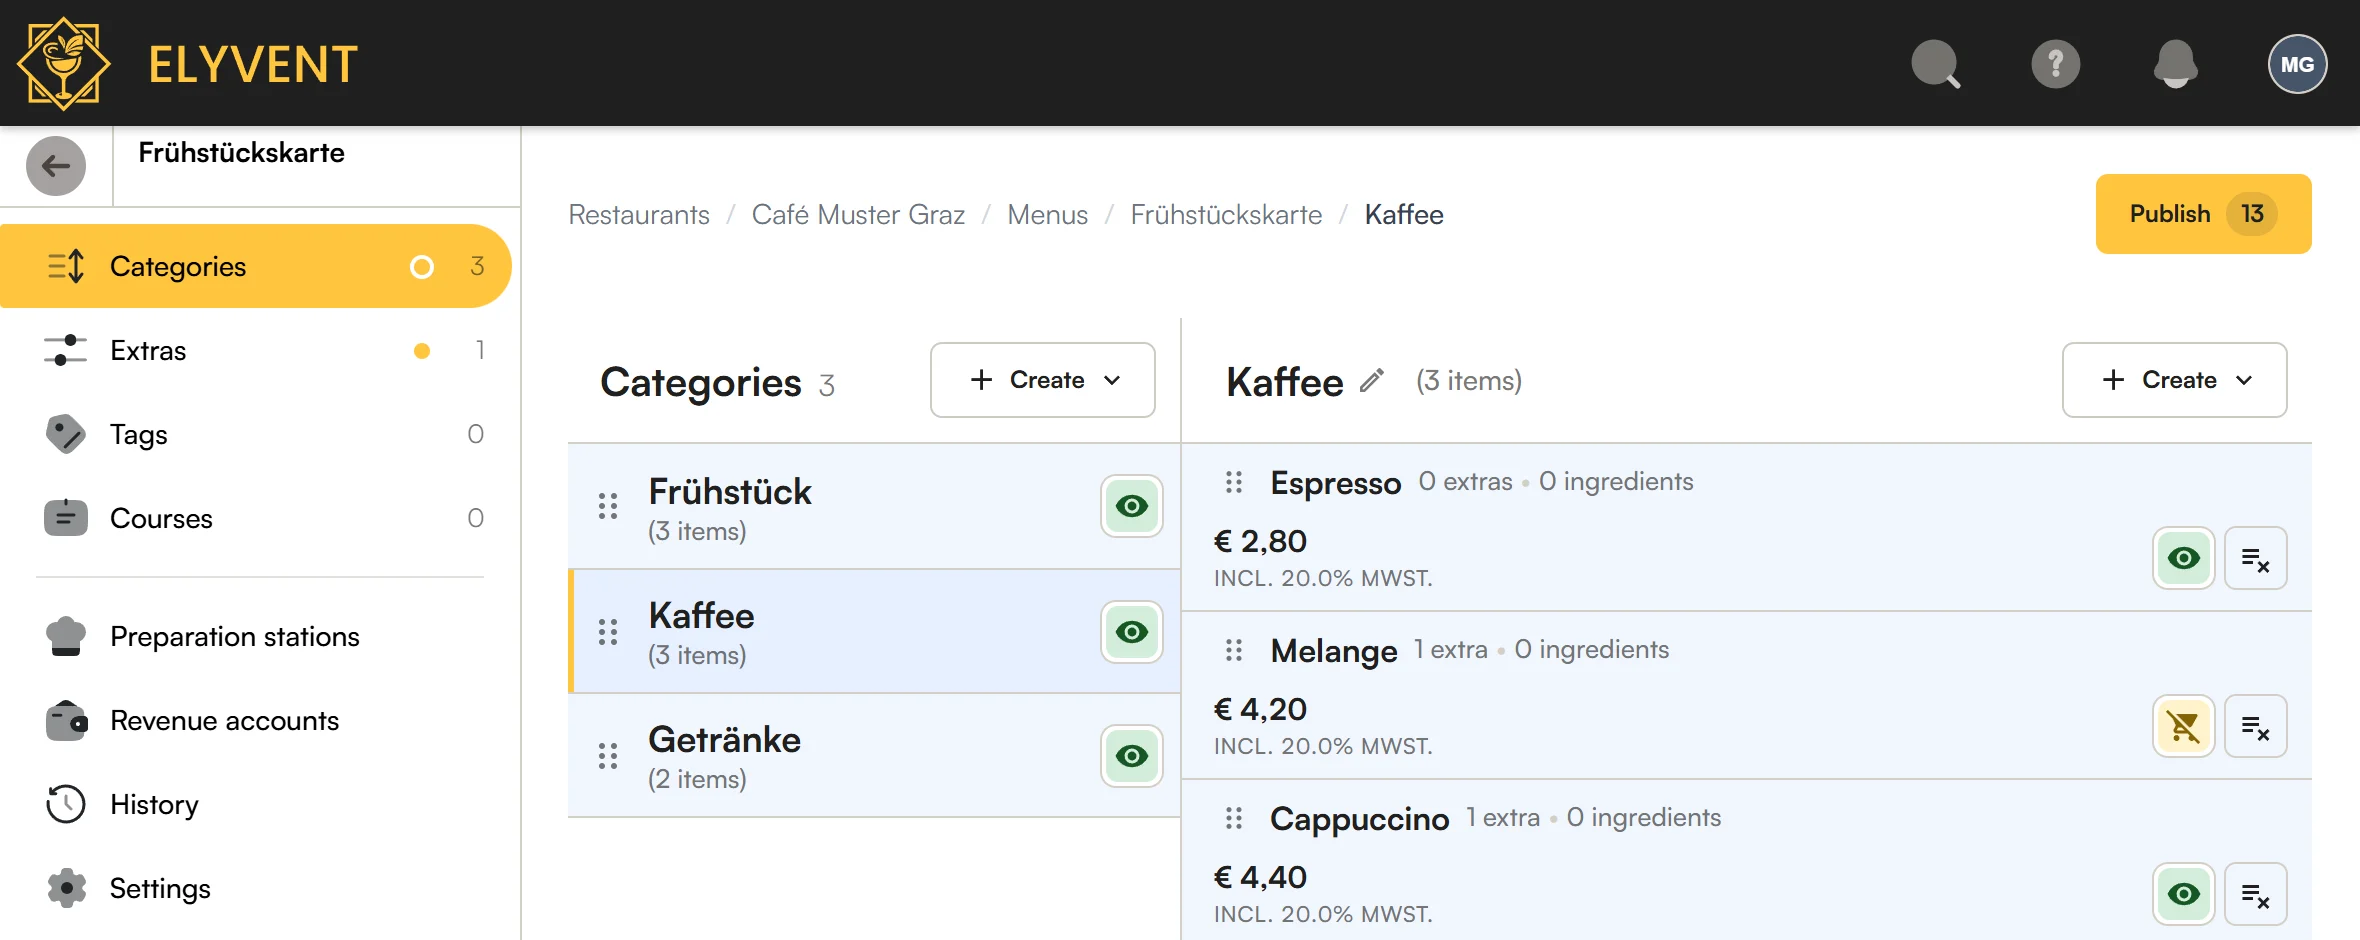
- On the left you choose what to edit: Categories with their items, Extras, Tags and Courses. Below are History and Settings.
- In the middle are the categories, on the right the items of the chosen category.
- At the top right, Publish shows how many changes are not published yet.
Add categories
- Next to Categories, tap Create → New category.
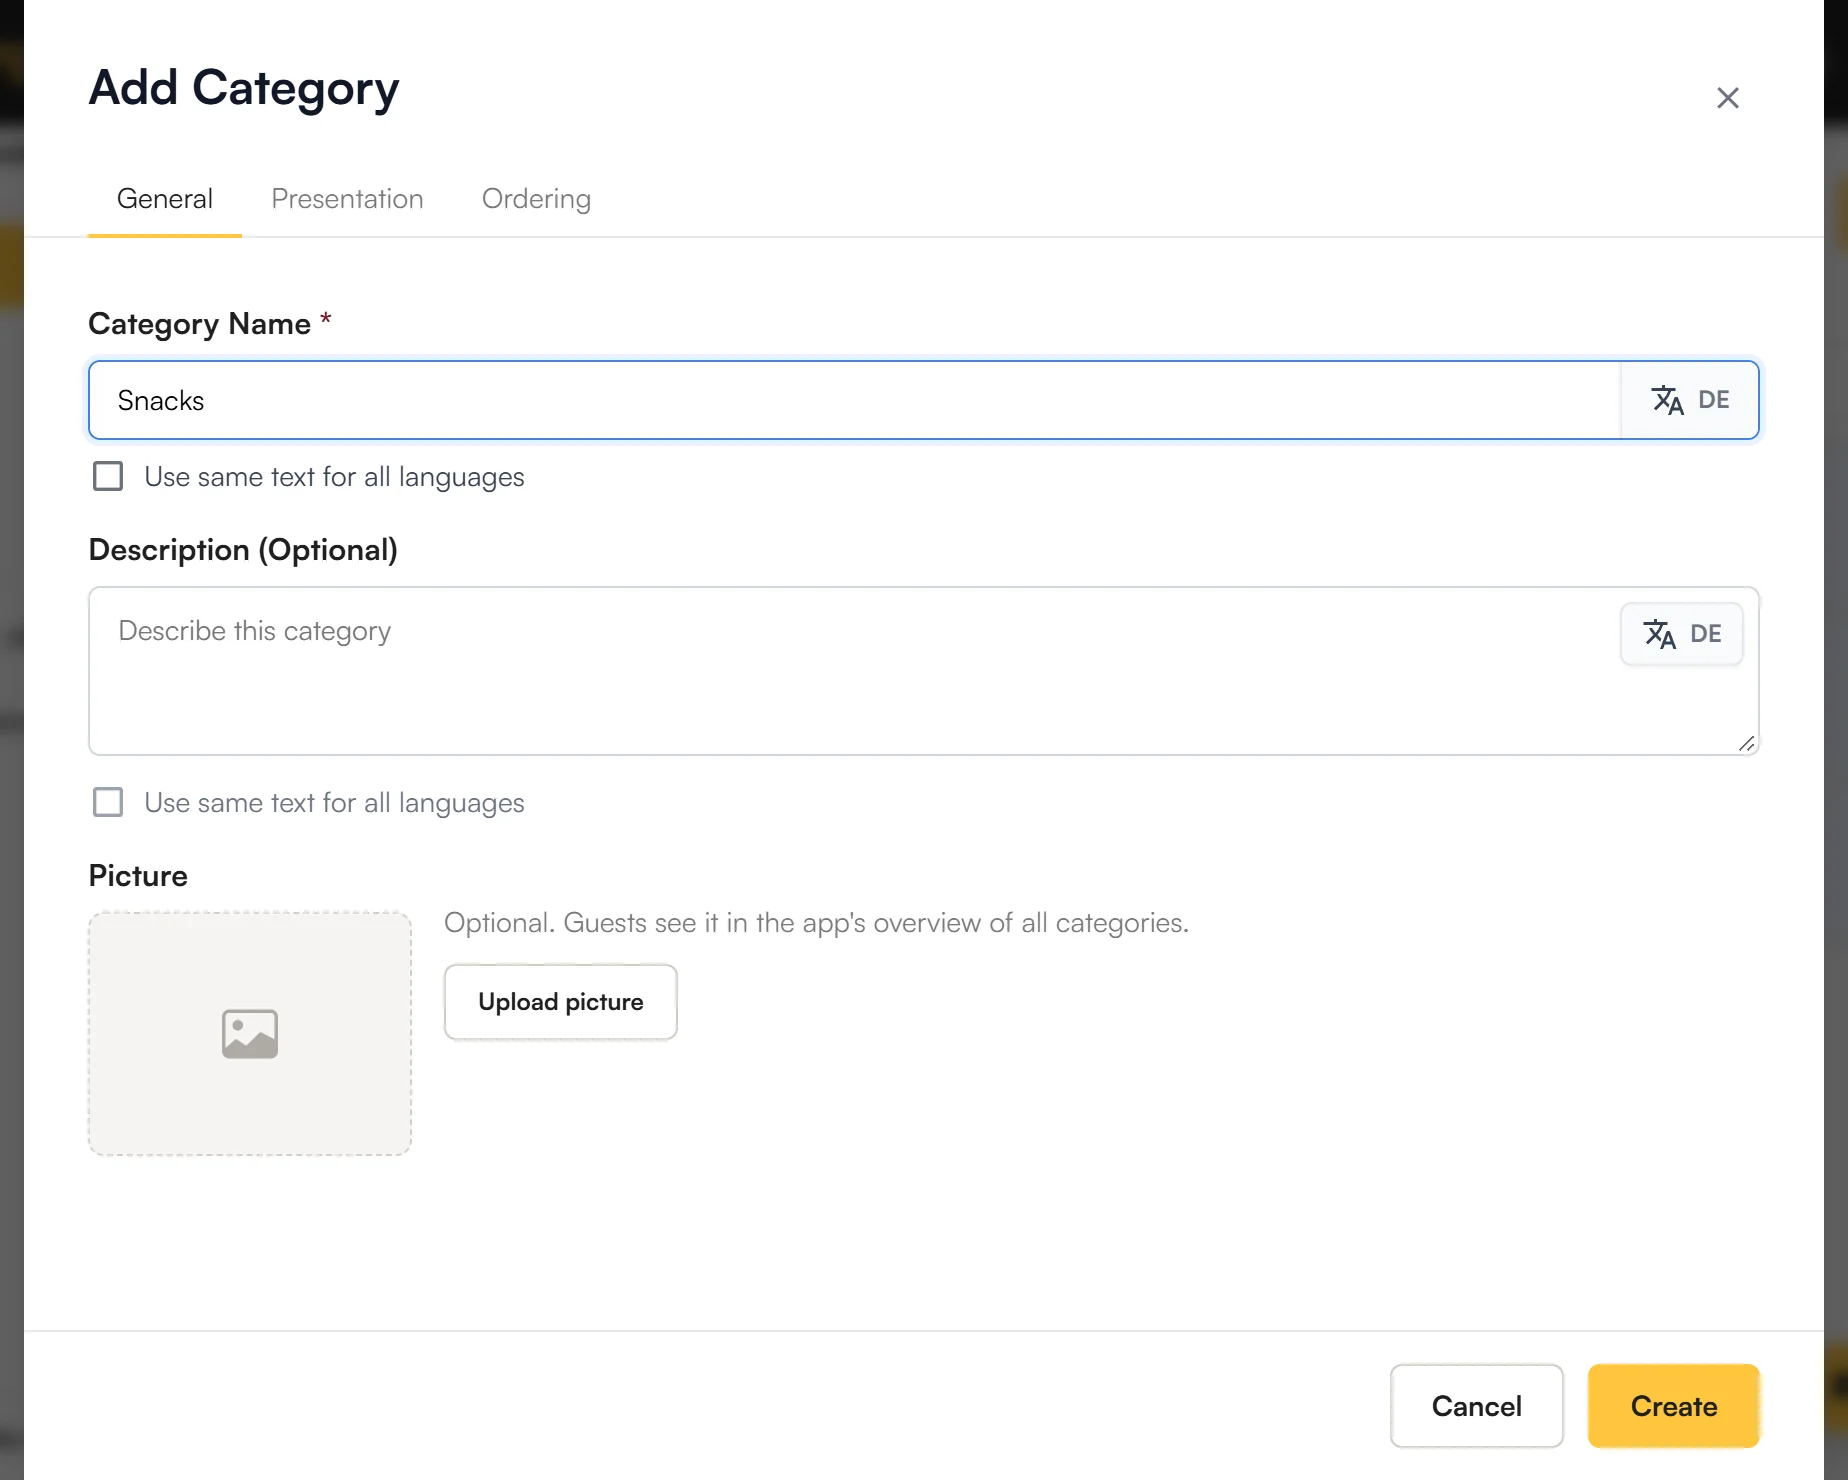
- Enter the name, for example “Snacks”.
- Tap Create.
| Tab | What you set there |
|---|---|
| General | Name, description and a picture. The app shows the picture in the overview of the categories. |
| Presentation | How the category looks, for example its colour at the till. |
| Ordering | Whether the category is active, which order types it is for and when it can be ordered from. |
- Other languages: The language button DE in a field shows and changes the text in the other languages. If something has the same name everywhere, for example “Espresso”, tick Use same text for all languages.
- Order: Drag the category by the dots ⠿ to its place.
Add items
- Choose the category in the middle, for example “Coffee”.
- On the right, tap Create → New menu item.
- Enter the name. The chosen category is already filled in.
- Tap Next and fill in the next tabs – at least the price.
- At the end, tap Create.
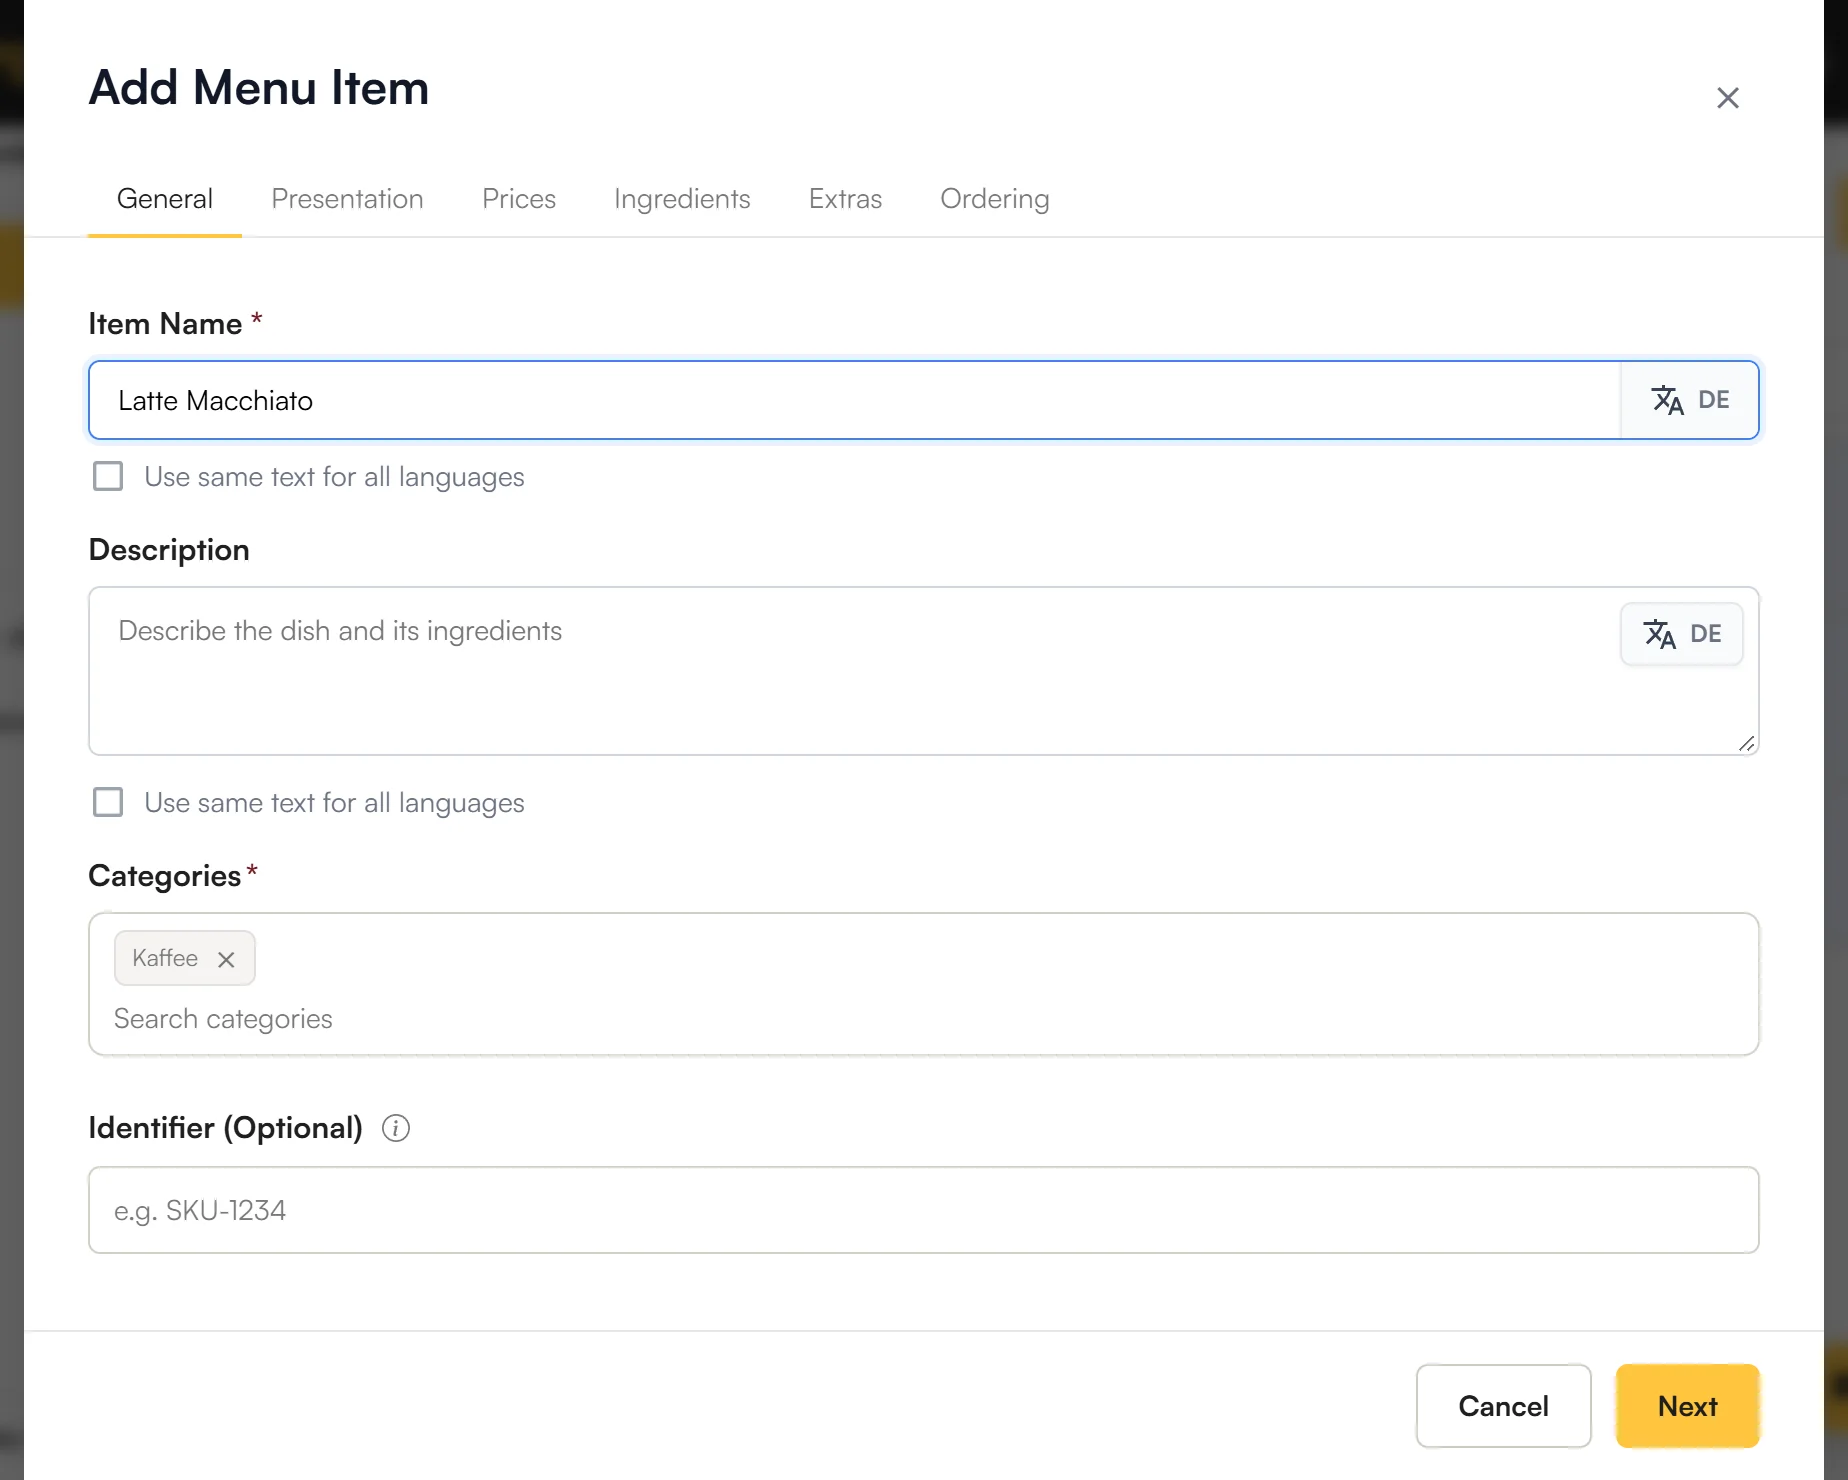
| Tab | What you set there |
|---|---|
| General | Name, description, categories and optionally your own identifier, for example your item number. |
| Presentation | Pictures, tags and which items the app suggests with it. |
| Prices | Prices and sizes, tax rate and revenue account. |
| Ingredients | Ingredients and allergens. |
| Extras | What the guest can choose with it, for example the milk. |
| Ordering | Availability, order types, course and where the item is prepared. |
Prices and sizes
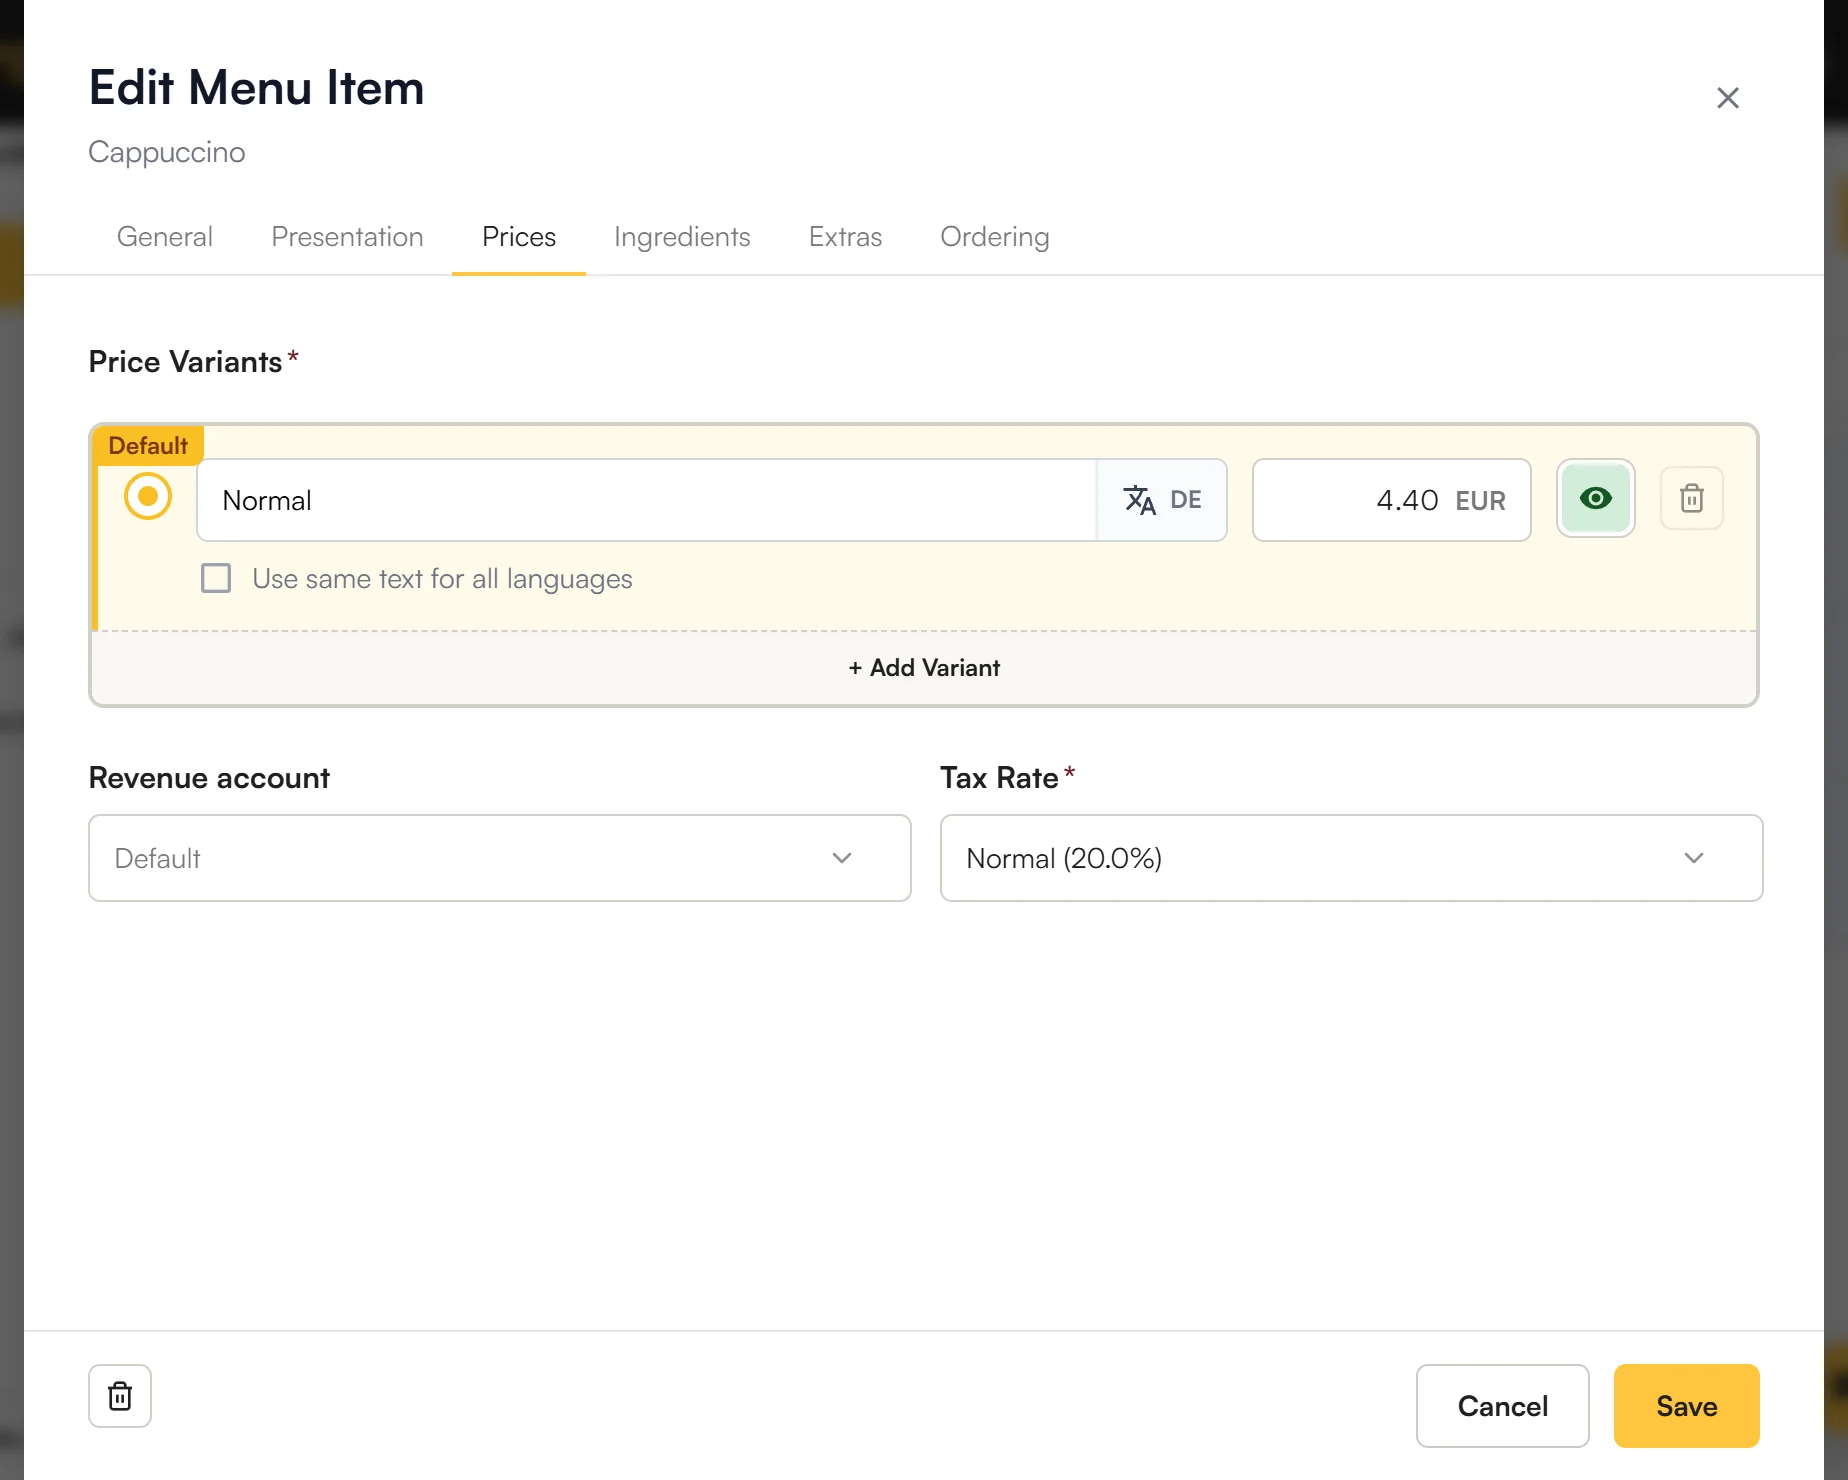
- Every item has at least one price. The variant marked Default is preselected when ordering.
- Several sizes: Tap + Add Variant, for example for “Small” and “Large”, each with its own price.
- Tax rate: must be set. If in doubt, check it with your tax adviser.
- Revenue account: only needed if your accounting books sales to separate accounts. Otherwise leave Default.
Extras: choices and surcharges
An extra is a question about the item, for example “Milk?” with cow’s milk, oat milk (+ € 0.50) and lactose-free milk (+ € 0.30). You create it once and attach it to as many items as you like.
- On the left, tap Extras → Add → Extra.
- Enter the name and the options, each with a surcharge if there is one.
- Set how many options the guest must and may choose – for example at most one.
- Open an item and choose the extra on the Extras tab.
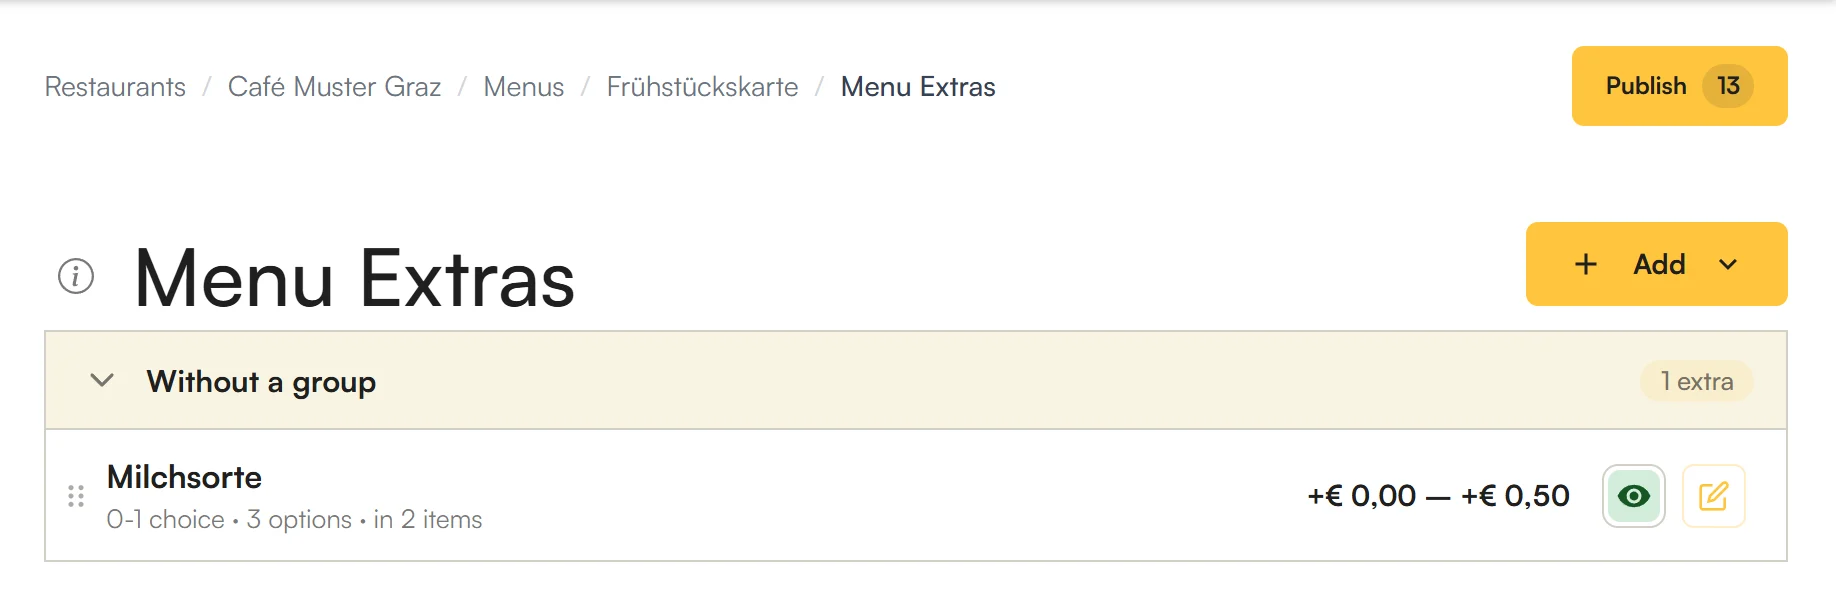
Must the guest choose something, for example the side dish? Then set the minimum to 1.
Tags and courses
- Tags describe items, for example “vegan” or “spicy”. You create them on the left under Tags and assign them in the item under Presentation.
- Courses set the order in which things are served, for example starter, main course, dessert. You create them on the left under Courses and assign them in the item under Ordering.
Active, Sold out, Hidden
If something has just run out, you switch it with one tap. It applies at once at the till and in the app – no publishing needed.
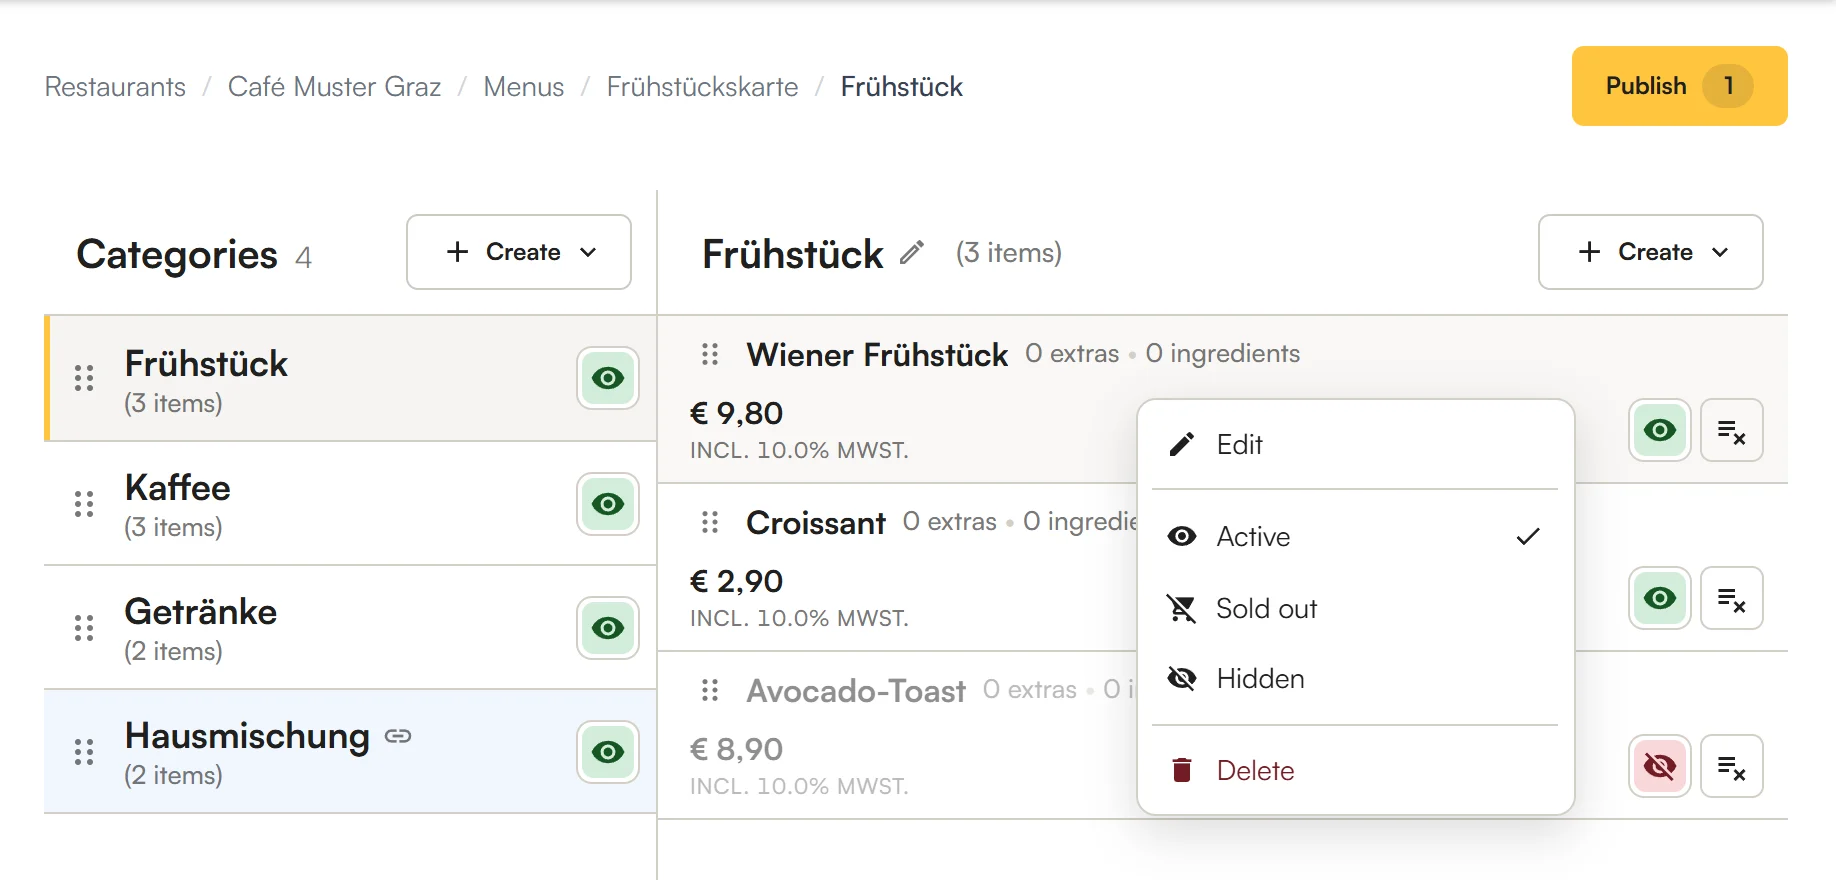
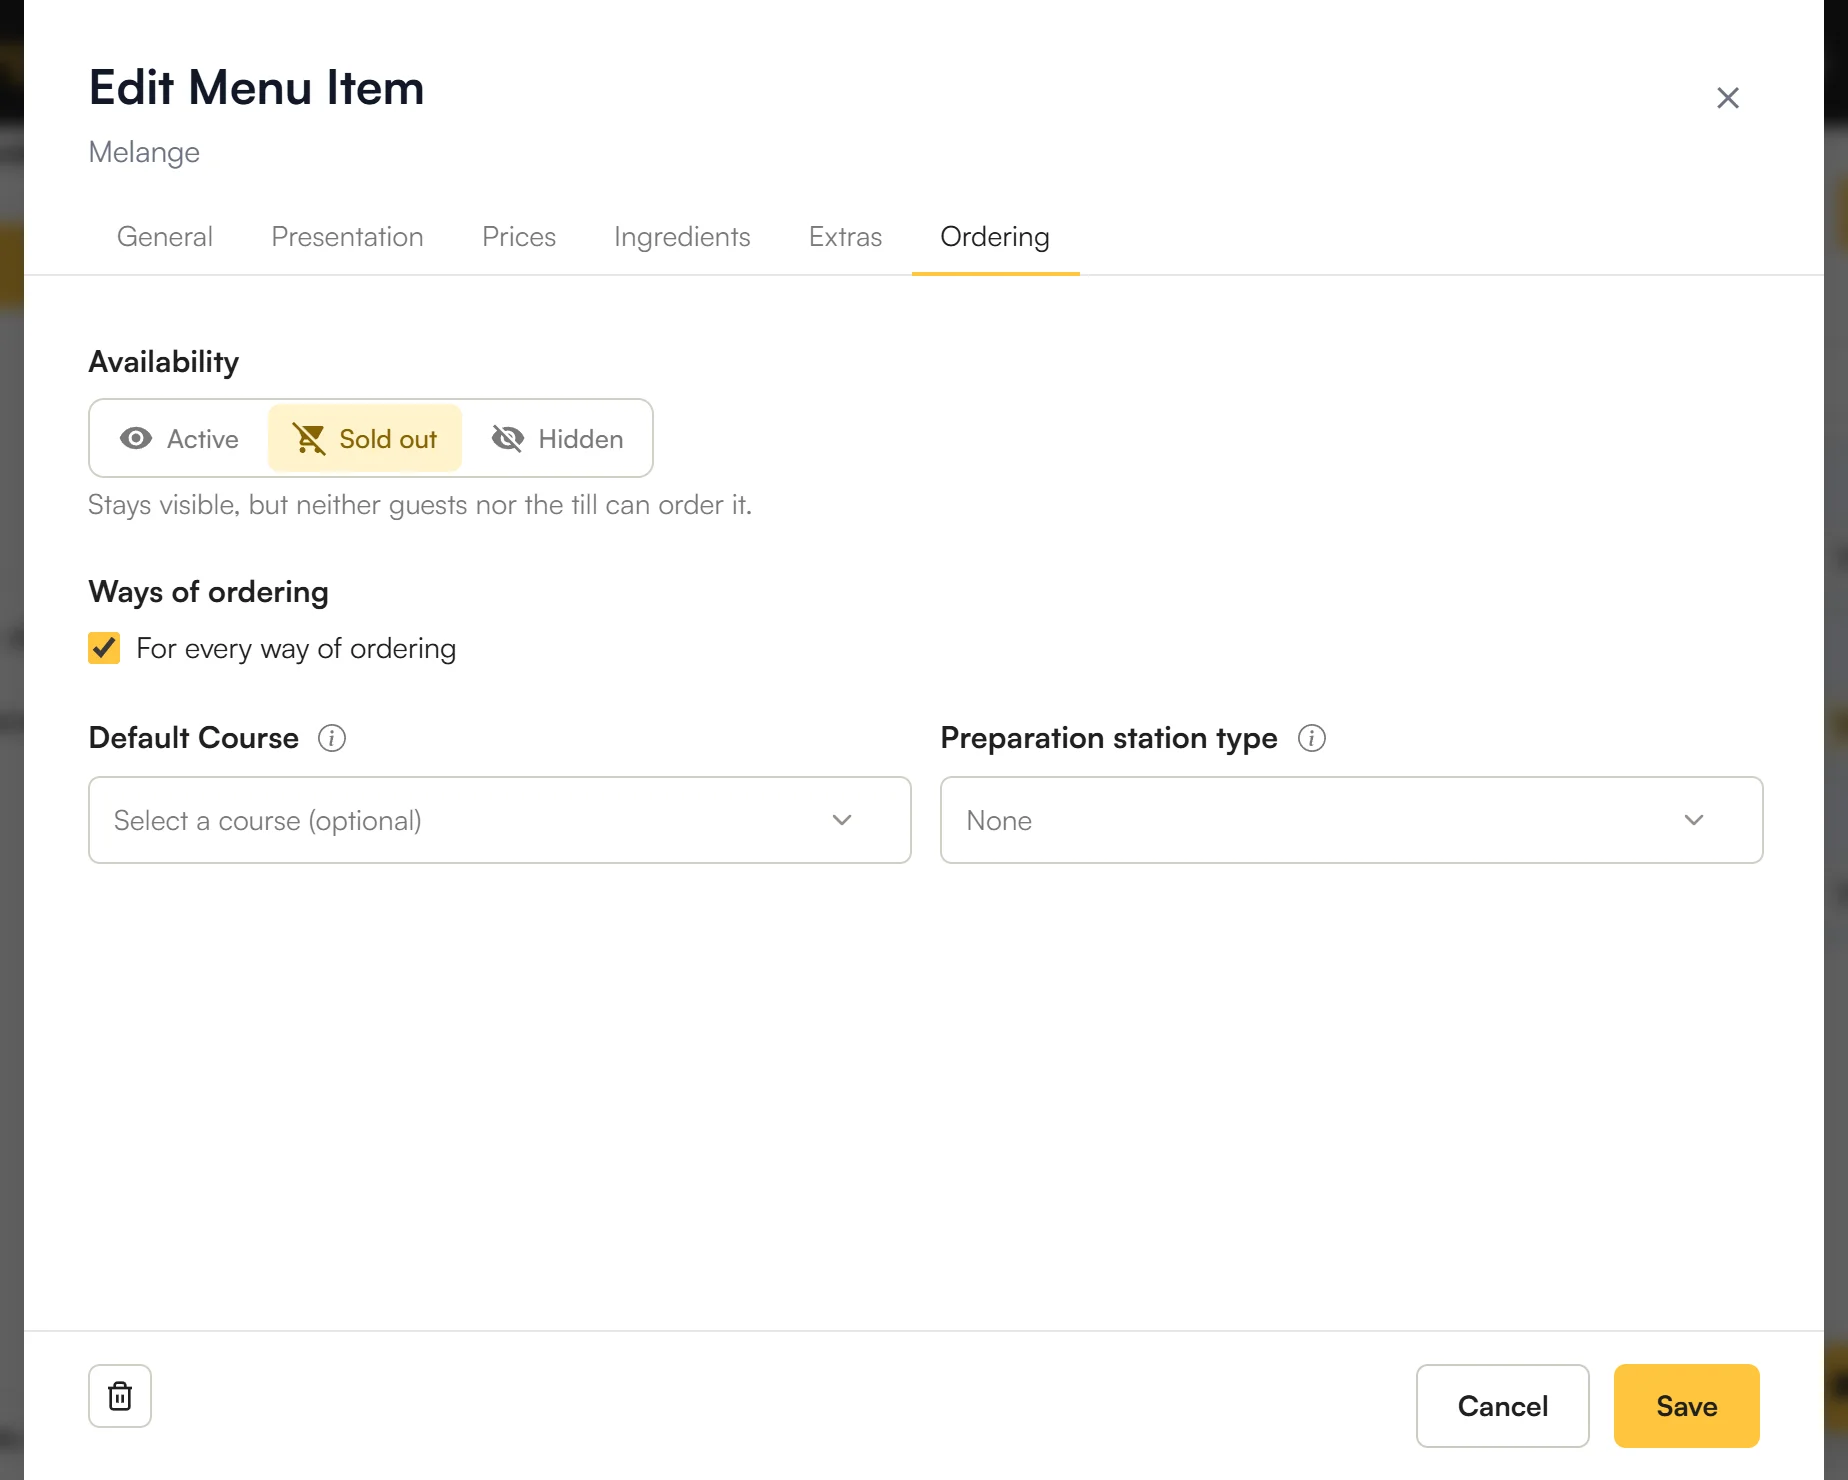
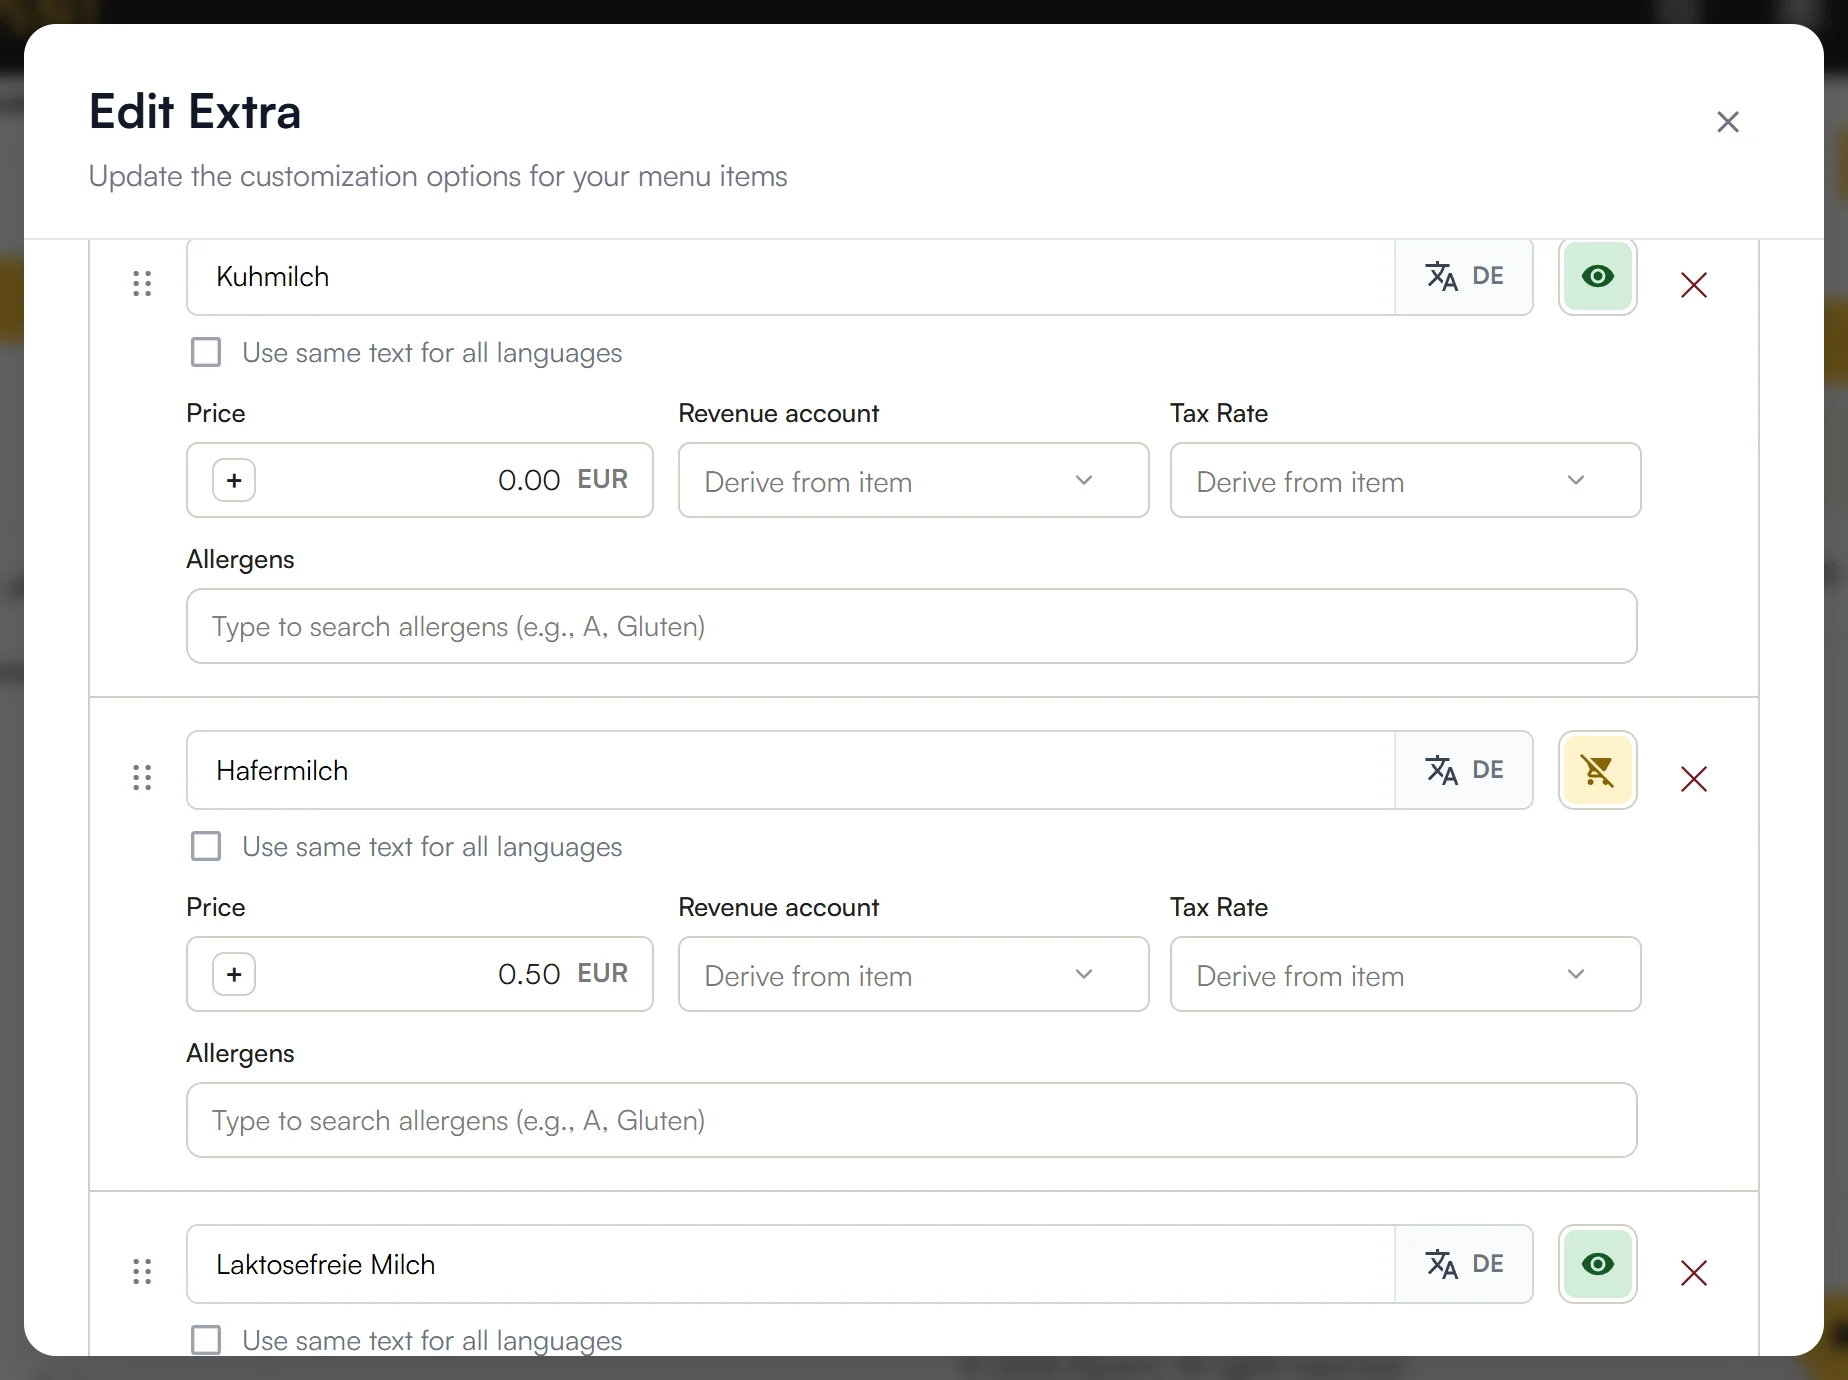
The coloured icon on the right of the row shows the state: green Active, yellow Sold out, red Hidden. Tap it and all three appear – tap the new one. On a computer you can also right-click.
| State | Guests in the app | Till | What for |
|---|---|---|---|
| Active | see it and order it | offers it | the normal case |
| Sold out | see it greyed out and can’t order it. If it is already in their basket, it drops out. | shows it greyed out; it can’t be added | The croissants are gone for today – there will be more tomorrow. |
| Hidden | don’t see it | doesn’t offer it | Something you don’t have for a while, for example ice cream in winter. |
What is already on a bill stays. Two croissants at table 4 are paid as usual, even if they have sold out since. Only a third can’t be added.
Where you set the state:
- Item: with the icon in its row, a right-click, or in the item under Ordering.
- Price variant: in the item under Prices, next to each variant. Example: the double espresso is out, the single one isn’t.
- Extra and option: on the Extras page next to each extra; inside the extra next to each option. Example: oat milk is out, cow’s milk is still there.
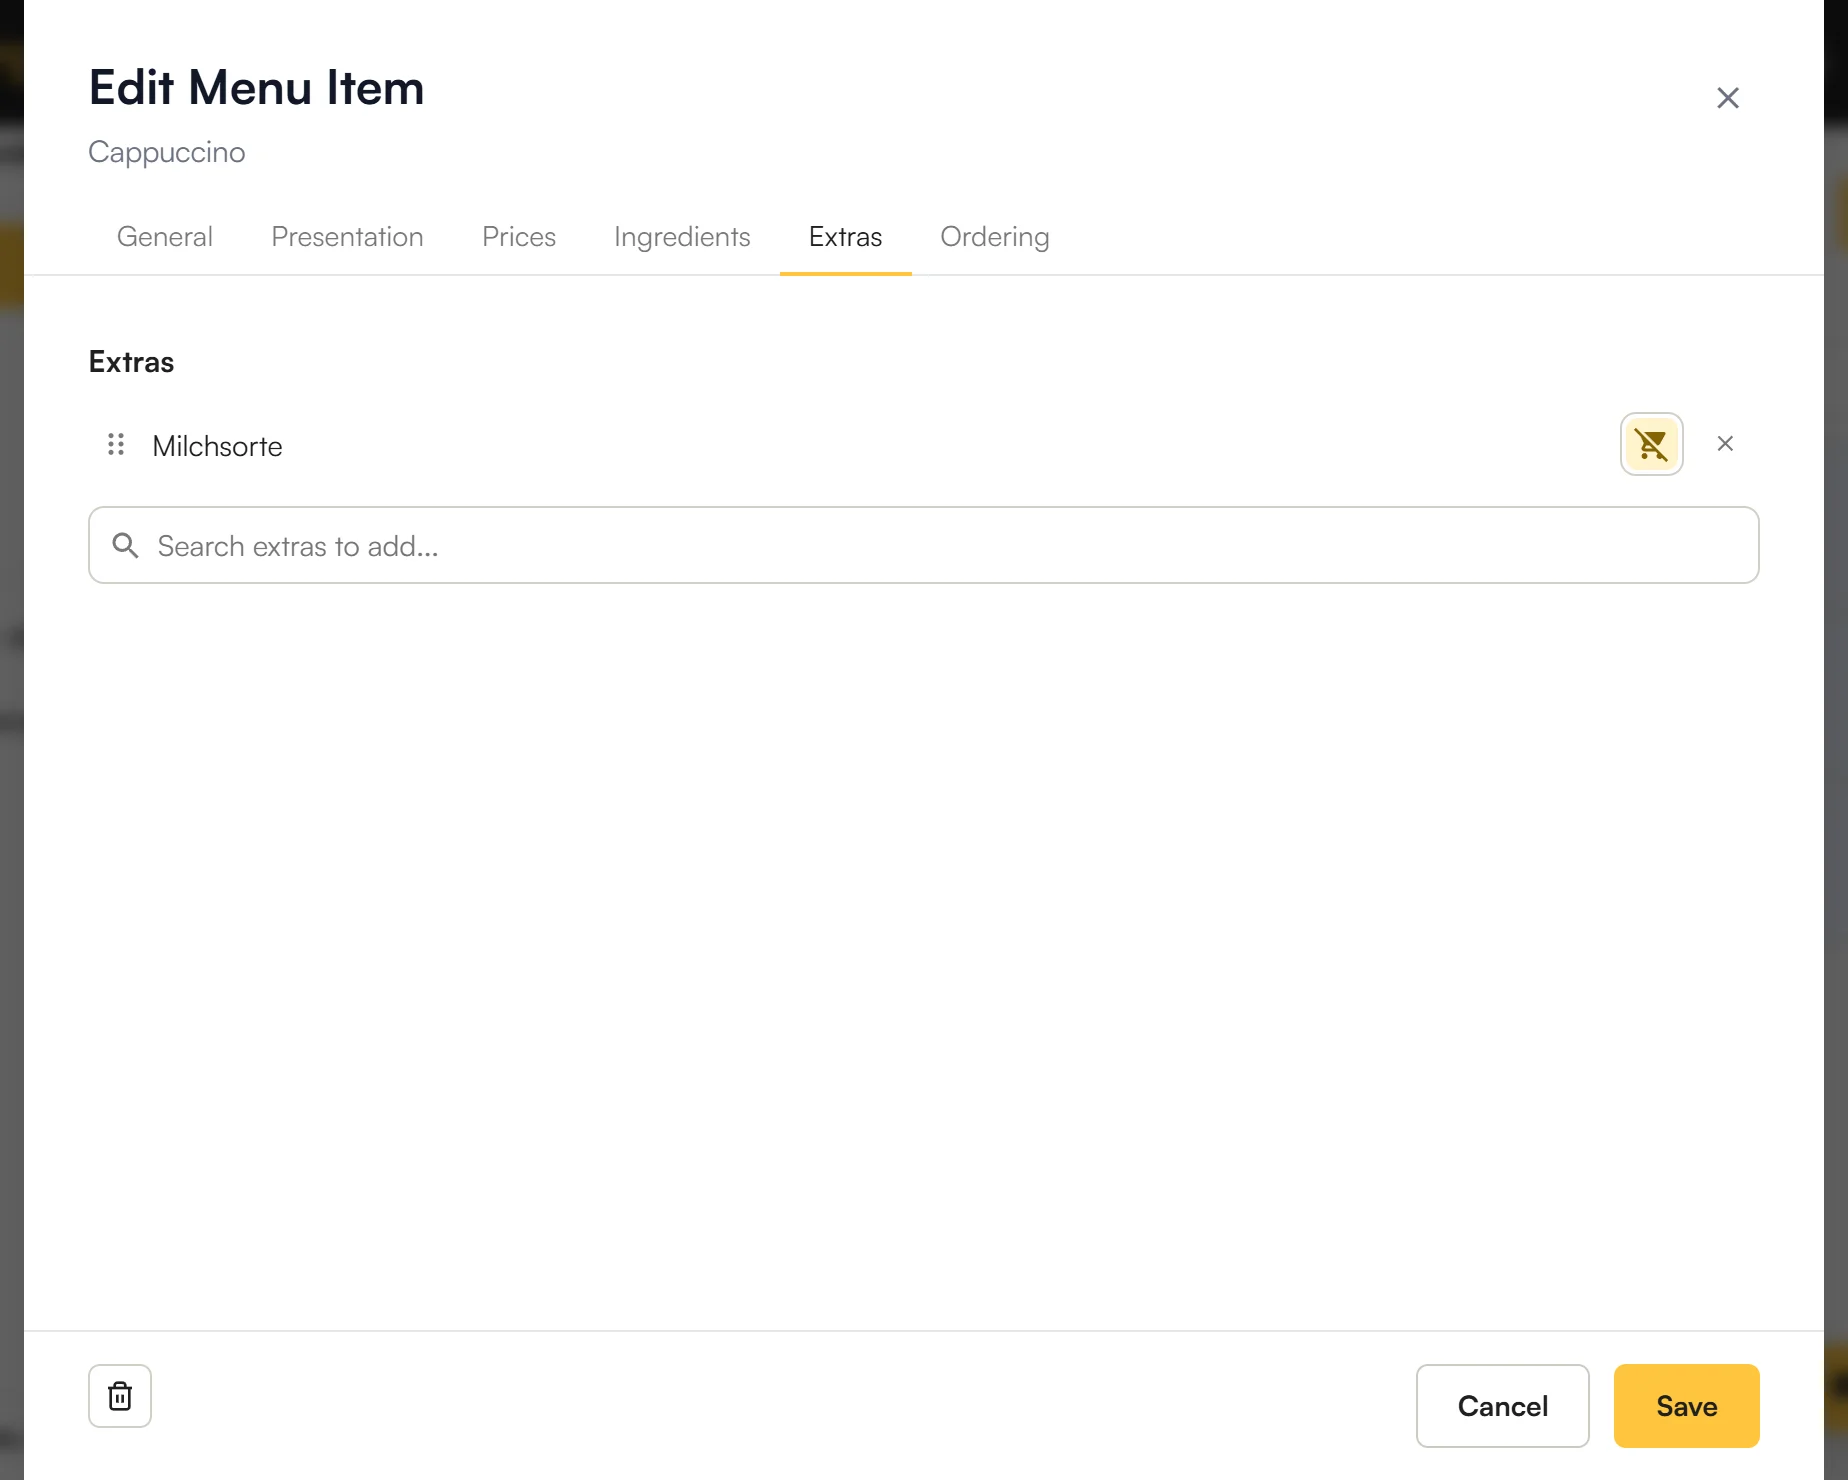
- Extra on one item: in the item under Extras, next to each extra. It applies to this item only. Example: the milk frother is broken – milk is out for the cappuccino, not for the hot chocolate.
- Category: only Active or Hidden.
Where two states meet, the stricter one applies. Example: oat milk is hidden, and the milk extra is sold out for the cappuccino. Then oat milk stays hidden there, and every other milk is sold out.
Good to know:
- The state applies to the whole restaurant, in every one of its menus – also where the item is linked. That is why Elyvent never asks “Change here only” or “Change everywhere” for it.
- If every variant is sold out, or an extra the guest must choose, the whole item is sold out.
- States don’t appear under Publish or in the history.
- A company menu has no states: what is sold out is up to each restaurant (Part 3).
Change, delete
- Change: Tap the item. On a computer you can also right-click → Edit.
- Remove from a category: with the button on the far right of the item. It stays in its other categories.
- Delete: right-click → Delete, or the bin at the bottom left inside the item. The item is only gone once you publish – until then you can bring it back in the History.
- Order: Drag the item by the dots ⠿ to its place.
Publish
Whatever you change is saved at once. Guests and the till only see it once you publish. That way you can prepare a new menu in peace.
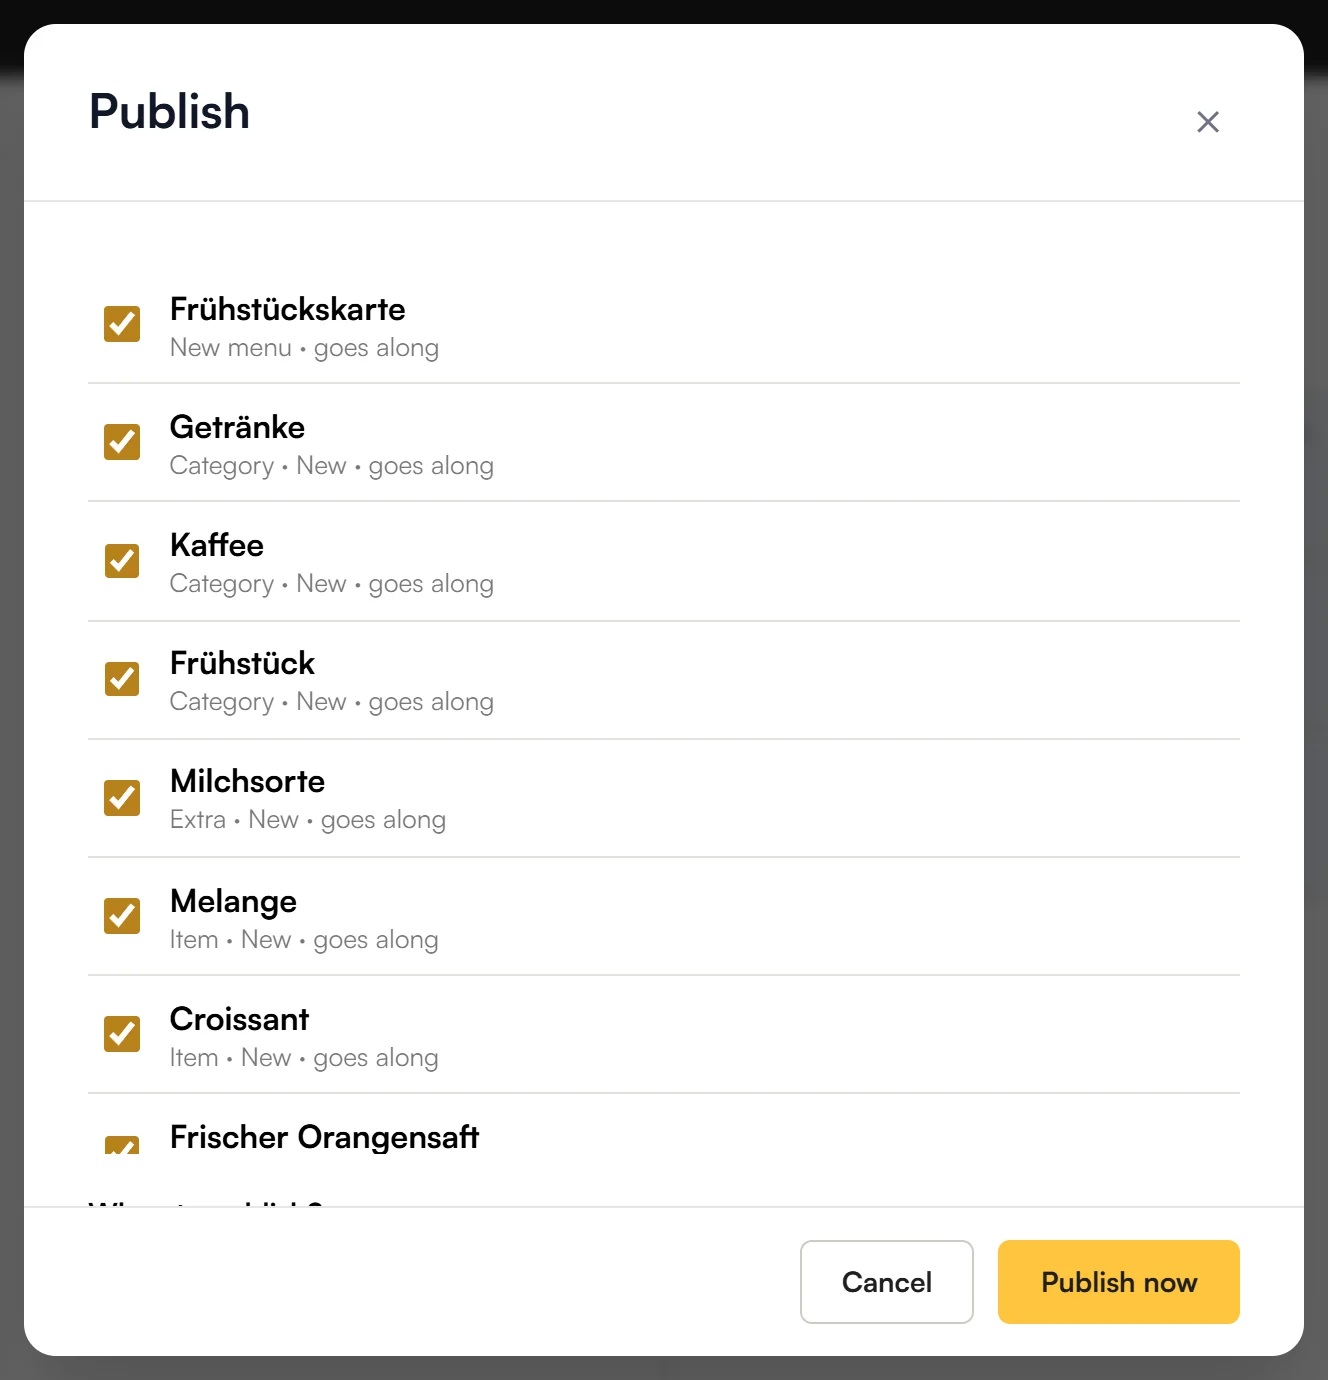
- Tap Publish at the top right. The number shows how many changes are waiting.
- You see each change on its own. Untick anything that should wait.
- Under “When to publish?” choose Now – or Later with a date and time.
- Tap Publish now.
If the menu is live, guests and the till see the changes at once – or at the planned time. Otherwise they wait until you switch the menu live.
Switch live
A restaurant can have many menus. The till and the app always show only one, though: the one marked Live. This is how you switch:
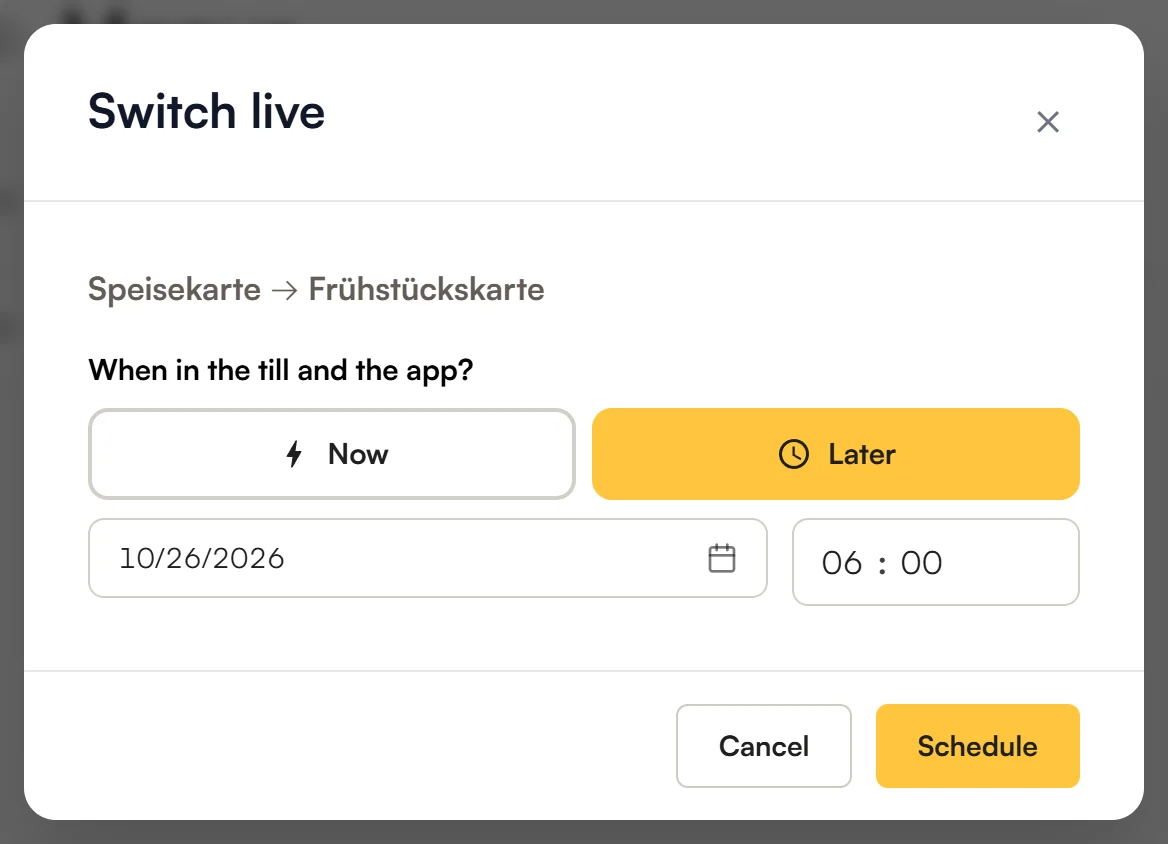
- In the Menus list, tap ⋮ next to the menu → Switch live….
- Choose Now – or Later with a date and time, for example tomorrow at 06:00.
- Confirm with the yellow button at the bottom right (Schedule if you chose “Later”).
- What goes live is the published state. Anything not yet published stays a work in progress.
- A menu that was never published can’t go live. Publish it first.
History: undo
On the left of the editor, under History, you see every change: what, who and when.
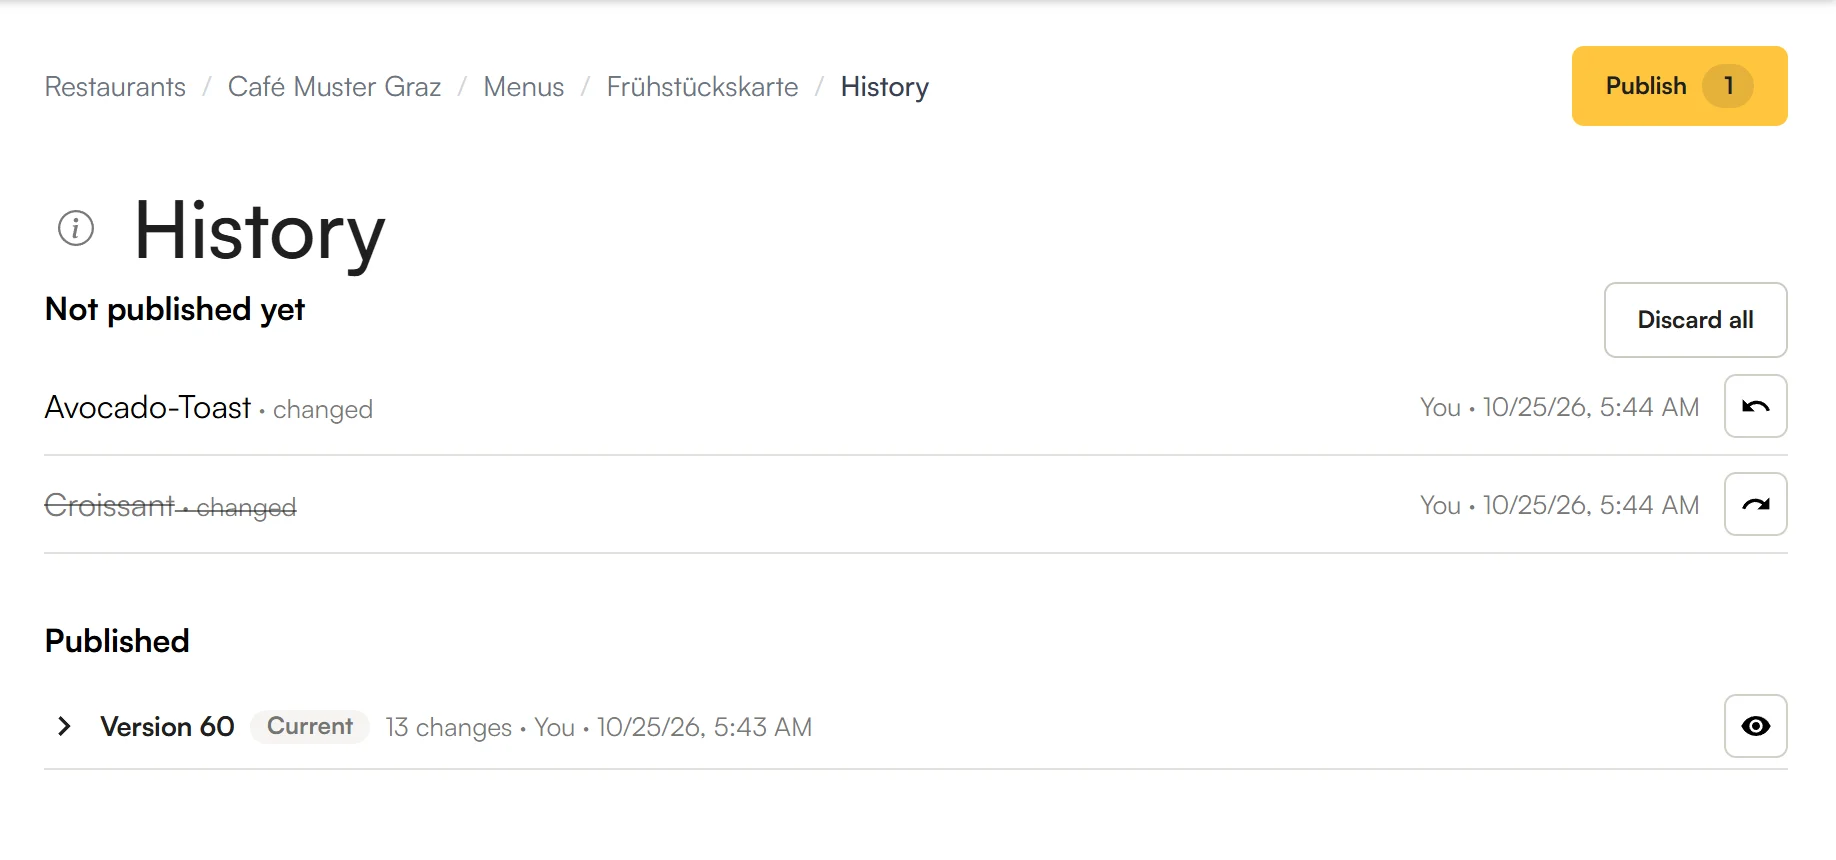
- Undo: Tap ↶ next to a change that isn’t published. It is struck through and no longer applies.
- Restore: Tap ↷ next to the struck-through change. It applies again.
- Undo everything: Discard all undoes all unpublished changes. That can be restored too.
- Old versions: Every publish is a version. The eye shows you an old state. Restore this version makes the menu as it was then – first as a change, which you then publish.
Organise menus
In the Menus list:
- Order: Drag the menu by the dots ⠿ to its place.
- Groups: Create → New group keeps menus together, for example all seasonal menus. Drag a menu into or out of the group – or choose the group in the menu’s Settings.
- Rename and delete: via ⋮ next to the menu. You can’t delete the menu that is live or about to go live – switch another one live first.
Frequently asked questions
Why don’t my guests see the change?
Usually for one of two reasons:
- The change is not published yet. If Publish shows a number above 0, changes are still waiting. See Publish.
- You changed a different menu from the one that is live. Check in the Menus list which one is Live.
An item is sold out – how do I take it off the menu for a while?
Tap the icon in its row and choose Sold out (the crossed-out cart). This applies at once, without publishing. When it’s back, set it to Active. See Active, Sold out, Hidden.
What is the difference between Sold out and Hidden?
Sold out: you have the item, just not right now – guests and the till see it greyed out. Hidden: you don’t have it at the moment at all – guests don’t see it, and the till doesn’t offer it. Rule of thumb: if it’s back today or tomorrow, use Sold out.
What happens to a sold-out item that is already on a bill?
It stays and is paid as usual. No more of it can be added – not with + in its line either.
A guest already had the item in the basket – what happens?
It drops out as soon as the item is sold out or hidden – even in the middle of ordering. The same applies to a variant or option.
How do I offer an item in two sizes?
In the item under Prices → + Add Variant. Each size gets its own name and price. See Prices and sizes.
How do I charge extra, for example for oat milk?
With an extra: create “Milk” with the options and their surcharges and attach it to the coffees. See Extras.
Can an item be in two categories?
Yes. In the item under General → Categories, choose both. It stays a single item: change it, and it changes in both categories.
How do I offer breakfast only in the morning?
In the category under Ordering, set the times when it can be ordered from. If you’d rather switch to an entirely different menu at a certain time, plan it with Switch live → Later.
How do I change prices from a certain day?
Change the prices now and, when you publish, choose Later with a date and time. Until then the old prices apply.
How do I add a photo to an item?
In the item under Presentation → Add Image. Guests see it once you publish.
I changed or deleted something by mistake.
Open the History and tap ↶ next to the change. If it was already published, bring back the old state with Restore this version.
Can I take over my existing menu?
Yes, with the AI: create a new menu and drop your PDF, Word document or photo into the Import with AI field. See Create a new menu.
What’s next?
You want to show the same items in a second menu without looking after them twice? Continue with Part 2: Reuse items.